Edit: 13 February, 2018 I have created Joomla Extension for typing in 23 Indian languages so you don’t need to manually make a code change. Just download the extension, install it and enable.
Download Joomla Indic Typing Extension
Today I am going to explore various ways to easily type in 23 Indian languages in your favorite CMS Joomla.
Supported Joomla Version
Joomla 3.8.1
Supported Indian Languages
- Assamese
- Bengali
- Bodo
- Dogri
- Gujarati
- Hindi
- Kannada
- Kashmiri
- Konkani
- Maithili
- Malayalam
- Manipuri
- Marathi (Devnagari/Modi)
- Meitei
- Nepali
- Odia
- Punjabi
- Sanskrit
- Santali (Ol Chiki)
- Sindhi
- Sora
- Tamil
- Telugu
There are 2 methods you can use depending on your editor choice.
- Using TinyMCE editor (Out of the box, No customization)
- Using TinyMCE editor (Php code change, Full customization)
Using TinyMCE Editor (Out of the box, No customization)
It is assumed that TinyMCE editor is your default editor. You can check/set it by going to Joomla Administration > System menu > Global Configuration and look for Default Editor.
Download PramukhIME TinyMCE plugin and extract it at WEBROOT\media\editors\tinymce\plugins so that “pramukhime” will become sub-folder of plugins.
Now from Joomla Administration menu, navigate to Extensions > Plugins > Editor – TinyMCE.
Click on “Editor – TinyMCE” to open up plugin settings
For “Set 2”, go all the way down and add “pramukhime” in Custom Plugin and “pramukhime, pramukhimehelp, pramukhimesettings, pramukhimeresetsettings, pramukhimetogglelanguage” in Custom Button. Repeat the same for “Set 1” and “Set 0” as shown in the image.
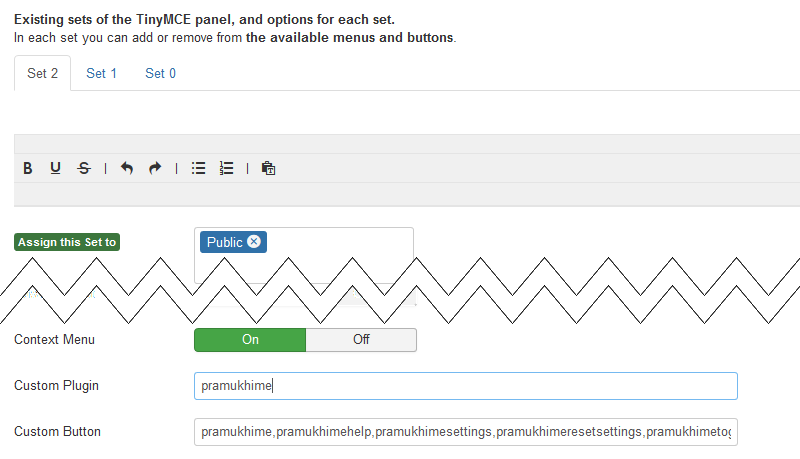

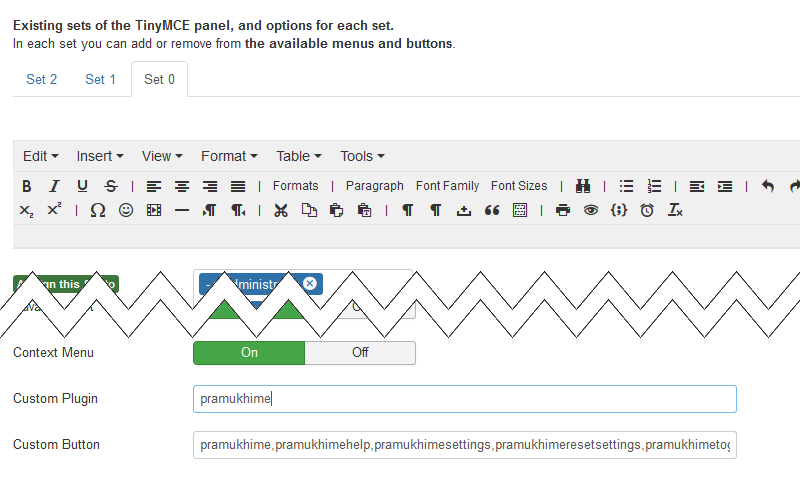
Click on “Save” or “Save & Close” button at the top.
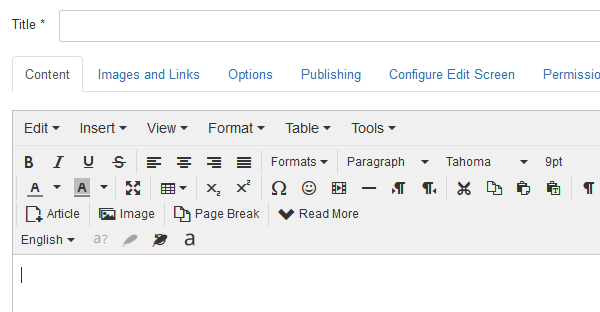
Now when you try to add new article, it will show you PramukhIME language list and all other buttons in the last toolbar
Using this method, you can quickly add capability for typing in 23 Indian languages however you can neither customize the language list nor utilize customization options available for PramukhIME TinyMCE plugin. The buttons can only be available in the last toolbar. If you really need the customization, follow the steps given in the next section.
Using TinyMCE editor (Php code change, Full customization)
It is assumed that TinyMCE editor is your default editor. You can check/set it by going to Joomla Administration > System menu > Global Configuration and look for Default Editor.
Download PramukhIME TinyMCE plugin and extract it at WEBROOT\media\editors\tinymce\plugins so that “pramukhime” will become sub-folder of plugins.
Add the following code to WEBROOT\layouts\plugins\editors\tinymce\field\tinymcebuilder.php to add a stylesheet at approximately line 56
JHtml::_(‘stylesheet’, ‘media/editors/tinymce/plugins/pramukhime/css/pramukhindic.css’, array(‘version’ => ‘auto’, ‘relative’ => false));
Add the following code to WEBROOT\plugins\editors\tinymce\tinymce.php to add customization options for PramukhIME at approximately line 672 (technically, we are adding more options for variable $scriptOptions). Modify language list and other options as per your need
// These options are optional. Use only if needed
$scriptOptions['pramukhime_options'] = array(
	// Optional. If this value is not provided, it will list all the available languages
	'languages' => array(
	array('text' => 'Pramukh Indic', 'value' => '', 'disabled' => true), // May be used for title
	array('text' => 'Assamese', 'value' => 'pramukhindic:assamese'),
	array('text' => 'Bengali', 'value' => 'pramukhindic:bengali'),
	array('text' => 'Bodo', 'value' => 'pramukhindic:bodo'),
	array('text' => 'Dogri', 'value' => 'pramukhindic:dogri'),
	array('text' => 'Gujarati', 'value' => 'pramukhindic:gujarati'),
	array('text' => 'Hindi', 'value' => 'pramukhindic:hindi'),
	array('text' => 'Kannada', 'value' => 'pramukhindic:kannada'),
	array('text' => 'Kashmiri', 'value' => 'pramukhindic:kashmiri'),
	array('text' => 'Konkani', 'value' => 'pramukhindic:konkani'),
	array('text' => 'Maithili', 'value' => 'pramukhindic:maithili'),
	array('text' => 'Malayalam', 'value' => 'pramukhindic:malayalam'),
	array('text' => 'Manipuri', 'value' => 'pramukhindic:manipuri'),
	array('text' => 'Marathi', 'value' => 'pramukhindic:marathi'),
	array('text' => 'Marathi (Modi)', 'value' => 'pramukhindic:marathimodi'),
	array('text' => 'Meitei', 'value' => 'pramukhindic:meitei'),
	array('text' => 'Nepali', 'value' => 'pramukhindic:nepali'),
	array('text' => 'Odia', 'value' => 'pramukhindic:odia'),
	array('text' => 'Punjabi', 'value' => 'pramukhindic:punjabi'),
	array('text' => 'Sanskrit', 'value' => 'pramukhindic:sanskrit'),
	array('text' => 'Santali (Ol Chiki)', 'value' => 'pramukhindic:santali'),
	array('text' => 'Sindhi', 'value' => 'pramukhindic:sindhi'),
	array('text' => 'Sora', 'value' => 'pramukhindic:sora'),
	array('text' => 'Tamil', 'value' => 'pramukhindic:tamil'),
	array('text' => 'Telugu', 'value' => 'pramukhindic:telugu'),
	array('text' => '-', 'value' => ''), // This will turn into menu separator
	array('text' => 'English', 'value' => 'pramukhime:english') // Note: the value contains pramukhime and NOT pramukhindic
	),
	// Uncomment the following value to select Sanskrit as the default language
	'selected_value' => 'pramukhindic:sanskrit', // Not required. Default value is 'pramukhime:english'
	// Use the toggle key as a keyboard shortcut to quickly switch between current and last selected language.
	'toggle_key' => array( // Not required. Default value is {key:120, ctrl: false, alt: false, title: 'F9'}. Customizes a toggle key which is a shortcut key responsible for switching
		// between currently and last selected languages.
		'key' => 119, // Required. F8 key's keycode
		'ctrl' => false, // Not required. If true, user must press "Ctrl" key + key to switch
		'alt' => false, // Not required. If true, user must press "Alt" key + key to switch
		'title' => 'F8' // Required. This title will be appended to the title of "English" language.
	),
);
In the same file, look for function definition for “getKnownButtons” and go approximately at line 1155 and insert the following code after “insertdatetime” and before the “return $buttons” statement.
'pramukhime' => array('label' => 'PramukhIME Language List', 'text' => 'PramukhIME', 'plugin' => 'pramukhime'),
'pramukhimehelp' => array('label' => 'PramukhIME Help', 'plugin' => 'pramukhime'),
'pramukhimesettings' => array('label' => 'PramukhIME Settings', 'plugin' => 'pramukhime'),
'pramukhimeresetsettings' => array('label' => 'PramukhIME Reset Settings', 'plugin' => 'pramukhime'),
'pramukhimetogglelanguage' => array('label' => 'PramukhIME Toggle Language', 'plugin' => 'pramukhime'),
Now from Joomla Administration menu, navigate to Extensions > Plugins > Editor – TinyMCE.
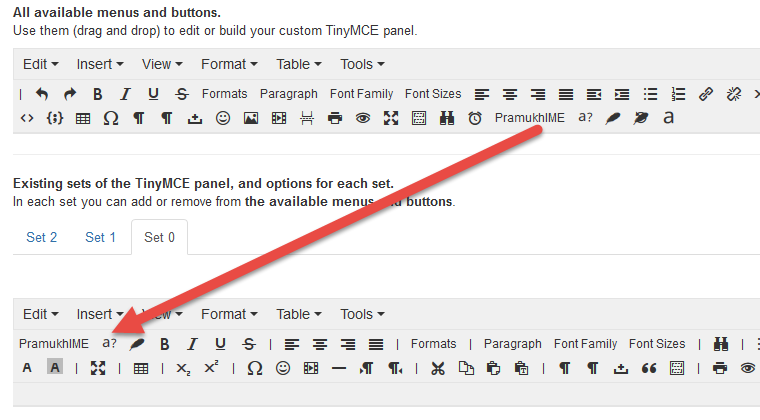
Click on “Editor – TinyMCE” to open up plugin settings and you will see the PramukhIME buttons available for drag and drop to “Set 2”, “Set 1” and “Set 0”.
Click on “Save” or “Save & Close” button at the top.
Now when you try to add new article, it will show you PramukhIME language list and all other buttons exactly where you put it
Leave a Reply